Change your nameservers (Full setup)
If you want to use Cloudflare as your primary DNS provider and manage your DNS records on Cloudflare, your domain should be using a full setup.
This means that you are using Cloudflare for your authoritative DNS nameservers.
Before you begin
Before you update your domain nameservers, make sure that you:
- Already own a domain name (such as
example.comorcloudflare.com).
- Have previously created a Cloudflare account.
- Disabled DNSSEC at your registrar (where you bought your domain name).
Provider-specific instructions
This is not an exhaustive list of how to update DS records in other providers, but the following links may be helpful:
Add site to Cloudflare
Review DNS records
When you start using Cloudflare’s nameservers for authoritative DNS and your zone is in a full setup, Cloudflare will become your primary DNS provider. This means that your DNS records in Cloudflare need to be accurate for your domain to work properly.
When you add a new site to Cloudflare, Cloudflare automatically scans for common records and adds them to the DNS zone. The records show up under the respective zone DNS > Records page.
Since this scan is not guaranteed to find all existing DNS records, you need to review your records, paying special attention to the following record types:
Update your nameservers
Once you have added a domain (also known as a zone) to Cloudflare, that domain will receive two assigned authoritative nameservers.
Get nameserver names
Log in to the Cloudflare dashboard and select your account and domain.
On Overview, locate the nameserver names in 2. Replace with Cloudflare’s nameservers.
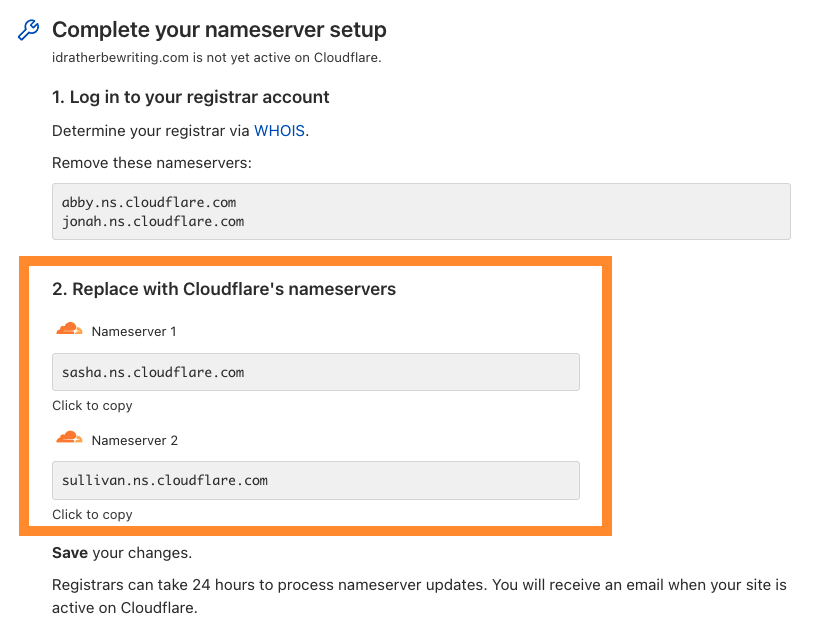
3. Keep this window open while you perform the next step.
Update your registrar
- Log in to the admin account for your domain registrar. If you do not know your provider, use ICANN Lookup.
Remove your existing authoritative nameservers.
Add the nameservers provided by Cloudflare. If their names are not copied exactly, your DNS will not resolve correctly.
Provider-specific instructions
This is not an exhaustive list of provider-specific instructions, but the following links may be helpful:
- 1and1
- 101Domain
- Amazon
- Blacknight
- BlueHost
- DirectNIC
- DNSMadeEasy
- Domain.com
- Dotster
- DreamHost
- EasyDNS
- Enom
- Fast Domain
- FlokiNET
- Gandi
- GoDaddy
- Google Domains
- HostGator
- Hostico
- HostMonster
- Hover
- Internetdbs
- iPage
- MediaTemple
- MelbourneIT
- Moniker
- Name.com
- NameCheap
- Network Solutions
- OVH
- Porkbun
- Rackspace
- Register
- Squarespace
- Site5
- Softlayer
- Yola
Verify changes
Wait up to 24 hours while your registrar updates your nameservers.
When your domain is Active:
- You will receive an email from Cloudflare.
- Your domain will have a status of Active on the Websites page of your account.
- Online tools such as https://www.whatsmydns.net/ will show your Cloudflare-assigned nameservers (most of these tools use cached query results, so it may take longer for them to show the updated nameservers).
- CLI commands will show your Cloudflare-assigned nameservers
*Linux/Unix*dig <DOMAIN_NAME> +trace @1.1.1.1dig <DOMAIN_NAME> +trace @8.8.8.8
*Windows*nslookup <DOMAIN_NAME> 1.1.1.1nslookup <DOMAIN_NAME> 8.8.8.8 Re-enable DNSSEC
When you updated your nameservers, you should have also disabled DNSSEC at your registrar.
You should now enable DNSSEC to protect from domain spoofing.